|
|
|
Volume Three - Using The Right Camera To Gather Evidence One of the most versatile devices in your Toolbox is your camera. These come in many different forms and have numerous options available that enhance your ability to capture visual evidence. Some of these are specialized and not easily combined in a single device, so we will look at each and note the benefits and problems associated with each of them. Still Camera or Video? The answer is Both! Each of these types of camera have abilities that provide evidence from your investigation. The still camera takes an individual frame and as a rule can provide a clearer image with better balance across the frame. Of course if motion is a factor you will need a video camera to capture that aspect of the location. But if you really want to do it right, use both! Capture the scene on video then take a second still image using a good quality camera. This topic will look at several of each format and outline the advantages of them as we go along. Many today have taken their phone camera as the primary camera. It seems everybody wants to drag their phone around and it has made its way into some investigator's toolbox. Unfortunately the phone is one of the poorest cameras you can use. it may be fine under normal conditions, but most investigations are far from normal. Often lighting is poor, pictures are taken at night or in areas less than ideal for pictures. Glare from nearby objects is often present. And there are several deficiencies in the basic design of the phone camera. Let's consider a few of them.
We'll start with the lens itself. The larger a lens diameter, the more light it will admit to the imager. If you have more light it makes the imager more efficient and does not require as much compensation in the camera electronics. Camera electronics, like all such electronic applications create noise. In the case of the camera this appears as a grainy picture or one with Low Dynamic Range which increases the possibility of pareidolia. Compare the lens size to even a cheap digital camera and difference becomes obvious. Even the makers of phones recognize this fact since the trend lately has been to include multiple cameras on a single phone. This addresses one issue but does nothing for the second, focal length. When a lens focuses the image the image will be much improved if the focal length is increased. The trouble is this requires the image be focused at a greater distance from the lens. This could be corrected on the phone camera except if it was fixed, the phone wouldn't fit in your pocket! As a result current phone cameras are suitable for general photography on a pre-investigation, but not recommended for actually obtaining evidence once the session is underway.  Another problem with small cameras is their size. The flash or illumination is very near the lens; there is just not room to separate them. This has led to the most common visual "evidence" we deal with. Orbs! I won't go into that here; a complete section in Volume 4 is devoted entirely to those! But the solution is to keep the source of light away from the lens, and a phone does a very poor job of that. If you step up to even a lost cost camera you can resolve both of these issues to a point. If not a Phone, What is the Best Camera? For that we go to the other extreme. Most SLR Cameras will do an excellent job. Many have removable lenses so you can change them out as needed for wide angle or macro use. Wide angle allows you to cover a wide field of view; the macro lens lets you move in close for shots that are only inches from the camera for fine detail images. The lens size is sufficient for low light conditions. Most lenses are coated, multi-element configurations which will minimize lens flare. The downside is their cost, but even that is manageable, and the best part, you will get much improved image quality which enhances your credibility as an investigator. Another consideration allows you to use an optical zoom lens for covering both near and distant fields. The optical zoom feature allows the scene to utilize the full pixel count of the imager. It works whether you are wide angle or zoomed in. Some phone cameras also claim a zoom feature but it is electronic zoom. That uses electronics to do the same thing except it only uses a portion of the imager when it is zoomed in. That means your resolution is much lower. It's like taking a 10 megapixel camera and reducing the quality to that of a 1 or2 megapixel camera. Actually you can do that on your computer after you take the picture with the same effect. This is what happens when you zoom in on any digital image. It's the same effect, with the same results. Pixelization can become an issue. Film or Digital? I have addressed that previously over the years. I have always recommended film and still do. But in all fairness digital quality has improved greatly. Back when I was strictly supporting film the best digital cameras were about 1 megapixel and did only a fair job of taking pictures. Many cameras back then didn't even allow for video operation; they were strictly still cameras. And the price of the camera itself was prohibitive. Today things have changed. Rather than limiting any particular camera based on its format, I make recommendations based on the capabilities of the individual camera itself. A large format digital camera will outperform even a good film camera. (Not that you need a camera THAT good to do an investigation!) Pricewise, most cameras retailing between $200 - $600 will do nicely on any investigation. Anything much over that range is overkill, under that and I begin to wonder what corners were cut to hit the price point. Game Cameras There is another type of camera that sometimes is considered for certain investigations, that is the Game Camera. These are designed to capture images of wildlife as it wanders around, usually at night. They can be placed along a trail and will take a picture of anything that gets within range of its sensor. Some place them in the hopes of capturing a ghost or spirit but that is questionable at best. We don't even know for certain what constitutes a spirit, how can we know if one would activate one of these cameras? Game cameras are also used in the woods in conjunction with a Bigfoot or creature investigation. This is probably the best application for them with regards to the paranormal, although they may also be useful at catching someone if there is the possibility of a hoax. Most of these cameras can take good pictures if they are properly positioned. What About "Full Spectrum" Cameras? The short answer to that is "There is no such thing."  Figure 1 - The Spectrum To understand I.R., and for that matter U.V. photography, you need to understand the nature of each. Both are closely related to visible light, it is only their respective bandwidth that makes a difference. Refer to Figure 1. The top portion shows how the visible light portion of the spectrum and the Infrared and Ultraviolet relate. The wavelength of each, in nanometers, is shown below the spectrum. You can see that Infrared and Ultraviolet are simply an extension of the visible light portion. It sounds simple, but this extension also creates a problem for a camera. All light, Infrared through Ultraviolet can be focused through a lens. But no single lens can cover this wide of a bandwidth. Normal glass appears clear to visible light but becomes quite opaque as the wavelength increases deeper into the I.R. spectrum. Light behaves differently as it passes through such lenses. However there are materials which do allow I.R. to pass. The problem is these work poorly at the shorter wavelength visible light and almost completely block U.V. Likewise different materials work great in U.V and are worthless in I.R. No one material is good for all. The solution is multiple lenses, one for Infrared, another for visible light, and yet another for Ultraviolet. Which by now you probably notice, shoots a big hole in the idea many investigators have of a full spectrum camera. No single camera can cover a "full spectrum" properly. You will get poor quality, blurred, or false color pictures. These are also subject to various aberrations which lead to "ghosts" or other "paranormal" effects. The TV ghost busters are notorious for spreading these images on the shows because they look impressive and draw viewers. To do this photography properly you need a separate camera, or interchangeable lenses, designed specifically for the purpose you have in mind. Another fallacy is the idea of "modifying" a camera by removing the I.R. filter to make it into a night vision camera. It is true you can do so, but that filter is there for a reason. Take a look at the second section of Figure 1. It shows the typical response curve of a CCD imager in a digital camera. You can see that the imager does respond to I.R. as well as visible light. To that extent you can remove the filter and it will work. But you also must replace the filter with one that blocks visible light, otherwise light present outside the spectrum you are viewing will alter the exposure settings. And while you are at it, as discussed previously, the lens will need changed to one intended for I.R use. So unless you are willing to make these modifications as well, best thing is use the camera as intended, for visible light photography. Another problem when the filter is removed is color balance. The CCD imager is designed to compensate for the effects the filter introduces into the visible light spectrum. Removing it changes the overall response of the imager. Compare the two response curves in Figure 1. The region in the I.R. spectrum was compensated for by the imager. Now if all of a sudden I.R. is allowed in obviously the average response bandwidth has shifted downward. Color may be incorrectly rendered. That is why the pictures appear with a green or purple tint. You have altered the picture by incorrect use and as we have seen elsewhere, evidence should never be altered. It should be maintained in its original state. One more thing is illumination. Many want to use LED Infrared Illuminators. This is fine but keep in mind that having one of these in operation also sets up a perfect condition for reflections that you may not be aware of. Any reflective object in the room will bounce the I.R. light back just like a mirror. So keep that in mind when you suddenly see that bright orb in the picture that you know wasn't present when you looked. This is a common problem many overlook when they work with Infrared or night photography. You can get orbs in your pictures very easily even without flash under these conditions. Also be aware that different materials react to light based on its wavelength. You have seen those iridescent shirts that glow brightly under "Black Light". Imagine what a piece of airborne lint from one of those would look like in a dark room if it passed near your illuminator. And you got a picture of it.....(Seen quite a few of those "Best Ever pictures of a ghost" Videos posted.) So does all this mean I.R. Photography is to be avoided when investigating? Not at all. The trick is if you are going to use it, do it correctly. Use the appropriate lens on your camera. Be aware of the problems unique to working outside the visible light spectrum. And do what you can to minimize anomalies, especially when illuminating the scene. One way to do that is utilize a modification of a standard photography technique called Bounce flash. Instead of trying to make your narrow beam reach extreme distances, point it toward the ceiling or a reflective screen. This causes a more diffuse illumination that eliminates most strong shadows. You get a better balance of exposure across your field of view, and if anything is there it will be a more true representation of itself. Also be aware that there is absolutely no solid proof that a ghost or spirit is seen any better under infrared or ultraviolet than it is under visible light. The only reason this is a popular belief is because the number of false positives is much higher using these methods, thus a lot of unsubstantiated claims. So if you are working in these regions be especially critical of any results you get. I.R. Photography has a purpose in investigating but it also brings its own set of problems. You need to be aware of them and compensate accordingly if you choose to use it for your work. FLIR Thermal Imaging Cameras - Forward Looking InfraRed Systems
This is another item on many investigator's Wish List. But a good system is a bit pricey, and the cheaper ones do not provide reliable results. So before you go out and buy one, take the time to learn how they work. These cameras are actually an extension of the infrared camera except they extend further into the spectrum. Where the standard infrared camera uses the region just below visible light, FLIR extends down to longer wavelengths to photograph heat. And heat characteristics are somewhat different than those of visible light. For example, if you shine a light against a wall the light reflects back from the wall to illuminate the room around it. Long wavelength infrared does not reflect as well, rather it tends to warm the wall. If you turn off a visible light source that was shining against the wall the reflection ceases and the room becomes dark. With infrared, the warm wall continues to radiate heat. Even though the room is dark the wall remains visible on the camera. This scenario, or one very similar, has resulted in many false claims of spirits or other paranormal activity. The point is if you intend to do work with FLIR, learn how it works, What seems paranormal under visible light is quite normal under I.R.
So while a FLIR system does what is intended, there is no real evidence it in any way enhances a paranormal investigation. One possible exception would be on a Creature or Bigfoot investigation. It could very well help out with one big caveat..... That assumes Bigfoot is warm blooded! It will detect other warm blooded creatures in the woods though. And if you want to check your house for heat loss, electrical wiring for overheating conditions, or otherwise monitor for hot area, it works great! So it's up to you whether or not you want to invest the money into one just in case the situation comes up at some point where it would be helpful.
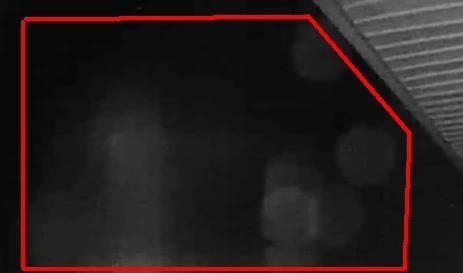
I Have My Camera. Now What? As a rule Point and Shoot cameras are not recommended. You need a camera that allows you to manually adjust the settings and do so under adverse conditions as we will see here. It's true you can sometimes luck out and get something, but there are many conditions working against you every time you take a picture in the dark under these conditions. Suppose you are out at night and look up. You see a bright light in the sky that looks like the flying object commonly reported. It's moving across the sky in an irregular manner that does not resemble anything conventional aircraft could do. You can even make out some details that appear to be windows along the side. You have your camera. Now's your chance! But you have only seconds before it moves behind a building and you will lose sight of it. You grab your point and shoot camera and manage to get several shots of it. Unfortunately you, like many other people who taken a similar picture, have a bright spot in the center of a black background. What happened? Why did the camera fail?The reason is the inability of the automatic features of your camera to make some corrections in the exposure. First, the image has an extremely high contrast to deal with. The camera sampled the overall frame intensity, which is fine under normal conditions. But because the sky and the area around the UFO was dark, the camera attempted to lighten the image resulting in the object being over exposed. Your camera reached saturation. The detail was lost with no way to bring it back. (Click here for explanation and example of a failed corrective attempt with saturation.) . If you had been using a camera with a manual lens / shutter setting you could close the aperture a couple stops or increase the shutter speed. This would have taken the automatic settings out of the mix letting you compensate for this kind of situation. The background in your picture would still be black, but the details on the object would have been preserved and could have been enhanced when you got the image home. Under an ideal condition you could take multiple pictures, each at a different setting. Some may end up being too dark, others too light. But there should be a few that were good. That method is the preferred fix for a situation like this. But it also illustrates the main problem. You don't have much time to fiddle around with your camera if something happens unexpectedly. That is where knowing your equipment becomes important. You need to be able to adjust the settings as quickly as possible and not need to guess at what you are doing. Let's Ramp It Up A Notch! The object you saw was also moving. But how fast and what direction? While you were trying to get your picture you could have also been writing down this vital information you may need later. (As if you weren't busy enough just trying to get the picture.) But there is another way; that would be to also have a second camera on a tripod set up taking a video of the event. This one you would have set so the background is slightly illuminated. Edges of houses or trees could be vital if they were in the frame as the object moved across. We now have point of reference to determine speed and direction with respect to the other fixed objects in the frame. Is such a degree of coverage even possible? Probably not, but it does demonstrate the level of data needed to conduct a thorough investigation. That means that even though you only have one camera you can keep a log of exactly where the object appeared with respect the other identifiable objects, noting how long and exactly what path it took. Later you can go back and fill in from memory the missing data to your log. There is another way pictures taken at night are often ruined. Many do not know the limitations of their flash. We mentioned Low Dynamic Range earlier. In cases where insufficient flash is available the picture will turn out under exposed. The picture below shows an example of insufficient flash. The area under the eaves of the house is marginally usable; the area in the box is beyond the range of the flash and is severely under exposed.<
You can see vague changes in the background intensity but no real definition. It is the perfect scenario to develop pareidolia. So let's do what many attempt; we'll lighten it somewhat and see what we can bring out.
now we can see a few orbs and some sort of hazy form. The orbs are the result of pollen or dust near the camera lens. And notice there is a hexagonal form present. This is due to the camera iris which is also hexagonal in form. It's nothing paranormal. But the hazy forms are strong "seeds" for paredolia. With a bit of imagination and a back story, it would not be hard to say the picture was a great photo of a spirit. As demonstrated here the proper way to get a better picture is to use the right camera and have the ability to manipulate its settings when you take the picture, not after you get it home on a computer. later in Volume Four we will cover analyzing and enhancing pictures. For now all we want is the best possible images to work with.
© MAY 2024 - J. Brown |